Spring boot with gradle
In this post we will discuss how to create a simple spring boot application with Gradle.

Application.java
Create the Application.java as below-
ControllerRest.java
@GetMapping-maps /hello request to test() method.
@RestController-is a convenience annotation that does nothing more than adding the
Compile and the run the ControllerRest.java as a Java application.
Go to localhost:8080/hello

what is Gradle
Gradle is a build automation system that is based upon the concepts from Apache Maven and Apache Ant. It uses domain-specific language Groovy, differentiating it from Apache Maven, which uses XML for its project configuration. Gradle uses directed acyclic graph to determine the task order.
Several developers created Gradle and first released in 2007, and in 2013, it was adopted by Google as the build system for Android projects. It was designed to support multi-project builds that are expected to be quite huge. It also allows for incrementally adding to your build, because it knows which parts of your project are updated. Tasks that are dependent on updated parts are no longer re-executed. For now, the latest stable release is version 3.4, which was launched in February 2017. It supports development and subsequent deployment using Java, Scala, and Groovy, with other project workflows and languages being introduced in the future reference.
Gradle vs Maven
There are some fundamental differences in the way that the two systems approach builds. Gradle is based on a graph of task dependencies – in which tasks are the things that do the work – while Maven is based on a fixed and linear model of phases. With Maven, goals are attached to project phases, and goals serve a similar function to Gradle’s tasks, being the “things that do the work.”
Performance-wise, both allow for multi-module builds to run in parallel. However, Gradle allows for incremental builds because it checks which tasks are updated or not. If it is, then the task is not executed, giving you a much shorter build time.
Some of the features offered by Gradle are:
- Declarative builds and build-by-convention
- Language for dependency based programming
- Structure your build
On the other hand, Apache Maven provides the following key features:
- Simple project setup that follows best practices - get a new project or module started in seconds
- Consistent usage across all projects means no ramp up time for new developers coming onto a project
- Superior dependency management including automatic updating, dependency closures (also known as transitive dependencies)
When it comes to managing dependencies, both Gradle and Maven can handle dynamic and transitive dependencies, to use third-party dependency caches, and to read POM metadata format. You can also declare library versions via central versioning definition and enforce central versioning. Both download transitive dependencies from their artifact repositories. Maven has Maven Central while Gradle has JCenter, and you can define your own private company repository as well. If there are several dependencies required, Maven can download these simultaneously reference.
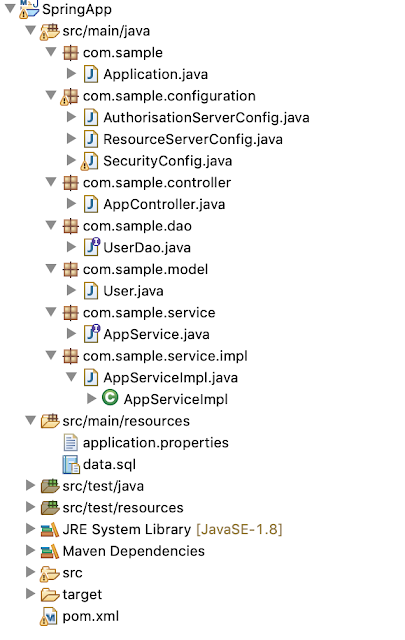
Project Structure
Following is the structure of the Spring Boot Gradle. We can create simple Gradle project by spring.io,

Dependencies
build.gradle
buildscript {
    repositories {
        mavenCentral()
    }
    dependencies {
        classpath("org.springframework.boot:spring-boot-gradle-plugin:2.1.6.RELEASE")
    }
}

apply plugin: 'java'
apply plugin: 'eclipse'
apply plugin: 'idea'
apply plugin: 'org.springframework.boot'
apply plugin: 'io.spring.dependency-management'

bootJar {
    baseName = 'SpringWithGradle'
    version =  '0.1.0'
}

repositories {
    mavenCentral()
}

dependencies {
    compile("org.springframework.boot:spring-boot-starter-web")
    testCompile("junit:junit")
} Create the Application.java as below-
package SpringWithGradle;


import org.springframework.boot.SpringApplication;

import org.springframework.boot.autoconfigure.SpringBootApplication;


@SpringBootApplication

public class Application {

 public static void main(String[] args) {

  SpringApplication.run(Application.class, args);

 }

}
@RestController-is a convenience annotation that does nothing more than adding the
@Controller and @ResponseBody annotation.
package SpringWithGradle.controller;


import org.springframework.web.bind.annotation.GetMapping;

import org.springframework.web.bind.annotation.RestController;


@RestController

public class ControllerRest {


 @GetMapping("/hello")

 public String test() {

  return "hello world";

 }

}
Go to localhost:8080/hello

Conclusion
In this tutorial we learned about creating a Spring boot application with gradle. If you have anything that you want to add or share then please share it below in the comment section.You can download the source from github.
Setup instructions may have been better, however luckily some third-party websites offer helpful movies and different getting-acquainted assist. The DigiLab 3D45 is made primarily for product developers, engineers, and different professionals, though it also should be helpful in schooling. The Original Prusa i3 MK3S+, the precision machining most recent iteration of Prusa Research's flagship 3D printer, adds sturdier elements and an improved print-bed leveling system to an already fine-tuned machine. The general distinction between these information comes means down to} the accuracy and element at which they'll retailer 3D objects.
ReplyDelete